跳到主要内容

· 阅读需 3 分钟
xu gao

个人网站迁移到后 Docusaurus 后我发现官网是没有对评论做支持的,所以果断上github issues里查了一下 果然有人问,发现大概是通过swizzling自定义主题增强实现的,所以我查阅了一些API下面我把实现方式发出来 其实并不难。

常用的评论系统

  1. giscus - 通过Github的Discussions功能实现
  2. utterances - 通过Github的Issues功能实现
  3. Disqus - 独立实现、类似搜狐畅言和多说这种

先决条件

  1. 你的项目运行 Docusaurus,至少有一篇博文或文档
  2. 你安装的主题是theme classic,也是默认的。
  3. 根据对应的评论插件注册一下拿到配置

本文以 giscus 为例借鉴参考,对接其他评论插件也是大同小异

配置 giscus

先登录你的github账号安装 giscus 应用 giscus app

进到giscus的官网配置好语言、评论要发到的github仓库、页面与映射关系, 选择一个discussion分类、主题等。 拿到配置好的 <script> 标签。

类似:

<script src="https://giscus.app/client.js"
data-repo="xxxxx"
data-repo-id="xxxx"
data-category="xxxx"
data-category-id="xxxxx"
data-mapping="pathname"
data-reactions-enabled="1"
data-emit-metadata="0"
data-input-position="bottom"
data-theme="light"
data-lang="zh-CN"
crossorigin="anonymous"
async>
</script>

在你的 Docusaurus 项目根目录执行

 yarn swizzle @docusaurus/theme-classic BlogPostPage

选择 Eject (Unsafe) 回车

选择 YES: I know what I am doing! 回车

这时你的项目目录下src/theme/BlogPostPage生成了自定义主题的文件

下一步修改文件

信息

下面三处标注是我们要修改添加代码的地方。 注意版本不同配置可能存在差异 根据标注自己找放评论的位置。

src/theme/BlogPostPage/index.js
import React, { useEffect, useRef }  from 'react';
import clsx from 'clsx';
import {HtmlClassNameProvider, ThemeClassNames} from '@docusaurus/theme-common';
import {BlogPostProvider, useBlogPost} from '@docusaurus/theme-common/internal';
import BlogLayout from '@theme/BlogLayout';
import BlogPostItem from '@theme/BlogPostItem';
import BlogPostPaginator from '@theme/BlogPostPaginator';
import BlogPostPageMetadata from '@theme/BlogPostPage/Metadata';
import TOC from '@theme/TOC';
function BlogPostPageContent({sidebar, children}) {
const {metadata, toc} = useBlogPost();
const {nextItem, prevItem, frontMatter} = metadata;
const {
hide_table_of_contents: hideTableOfContents,
toc_min_heading_level: tocMinHeadingLevel,
toc_max_heading_level: tocMaxHeadingLevel,
} = frontMatter;

const commentElement = useRef(null);

useEffect(() => {
// Update the document title using the browser API
let s = document.createElement("script");
s.src = "https://giscus.app/client.js";
s.setAttribute("data-repo", "[你的仓库]");
s.setAttribute("data-repo-id", "[你的仓库 ID]=");
s.setAttribute("data-category", "[你的分类名]");
s.setAttribute("data-category-id", "[你的分类 ID]");
s.setAttribute("data-mapping", "pathname");
s.setAttribute("data-reactions-enabled", "1");
s.setAttribute("data-emit-metadata", "0");
s.setAttribute("data-input-position", "bottom");
s.setAttribute("data-theme", "light");
s.setAttribute("data-lang", "zh-CN");
s.setAttribute("crossorigin", "anonymous");
s.async = true;
commentElement.current.appendChild(s);
}, []);

return (
<BlogLayout
sidebar={sidebar}
toc={
!hideTableOfContents && toc.length > 0 ? (
<TOC
toc={toc}
minHeadingLevel={tocMinHeadingLevel}
maxHeadingLevel={tocMaxHeadingLevel}
/>
) : undefined
}>
<BlogPostItem>{children}</BlogPostItem>

{(nextItem || prevItem) && (
<BlogPostPaginator nextItem={nextItem} prevItem={prevItem} />
)}

<div style={{marginTop:'20px'}} ref={commentElement}></div>
</BlogLayout>
);
}
export default function BlogPostPage(props) {
const BlogPostContent = props.content;
return (
<BlogPostProvider content={props.content} isBlogPostPage>
<HtmlClassNameProvider
className={clsx(
ThemeClassNames.wrapper.blogPages,
ThemeClassNames.page.blogPostPage,
)}>
<BlogPostPageMetadata />
<BlogPostPageContent sidebar={props.sidebar}>
<BlogPostContent />
</BlogPostPageContent>
</HtmlClassNameProvider>
</BlogPostProvider>
);
}

至此评论添加完成

其他

如果需要修改样式或者想使用其他组件直接去官方找文档对应配置就可以。

如果想用Disqus的话可以直接安装npm包引用到对应的界面就可以

yarn add disqus-react
# or
npm add disqus-react

Disqus配置+评论隐藏和展示控制

---
slug: your-blog-post-slug
...
draft: true
no_comments: false # for Disqus
---
import { DiscussionEmbed } from 'disqus-react'

function BlogPostPage(props) {
...
const { slug, title, description, nextItem, prevItem } = metadata
const { hide_table_of_contents: hideTableOfContents, no_comments } = frontMatter
...
return (
...
// after Edit this Page block
{!no_comments && (
<DiscussionEmbed
shortname='your_website_disqus_shortname'
config={{
url: slug,
identifier: slug,
title: title,
language: 'en_US',
}}
/>
)}
// before nextItem
...
)
}

参考

· 阅读需 2 分钟
xu gao

简介

help.png 
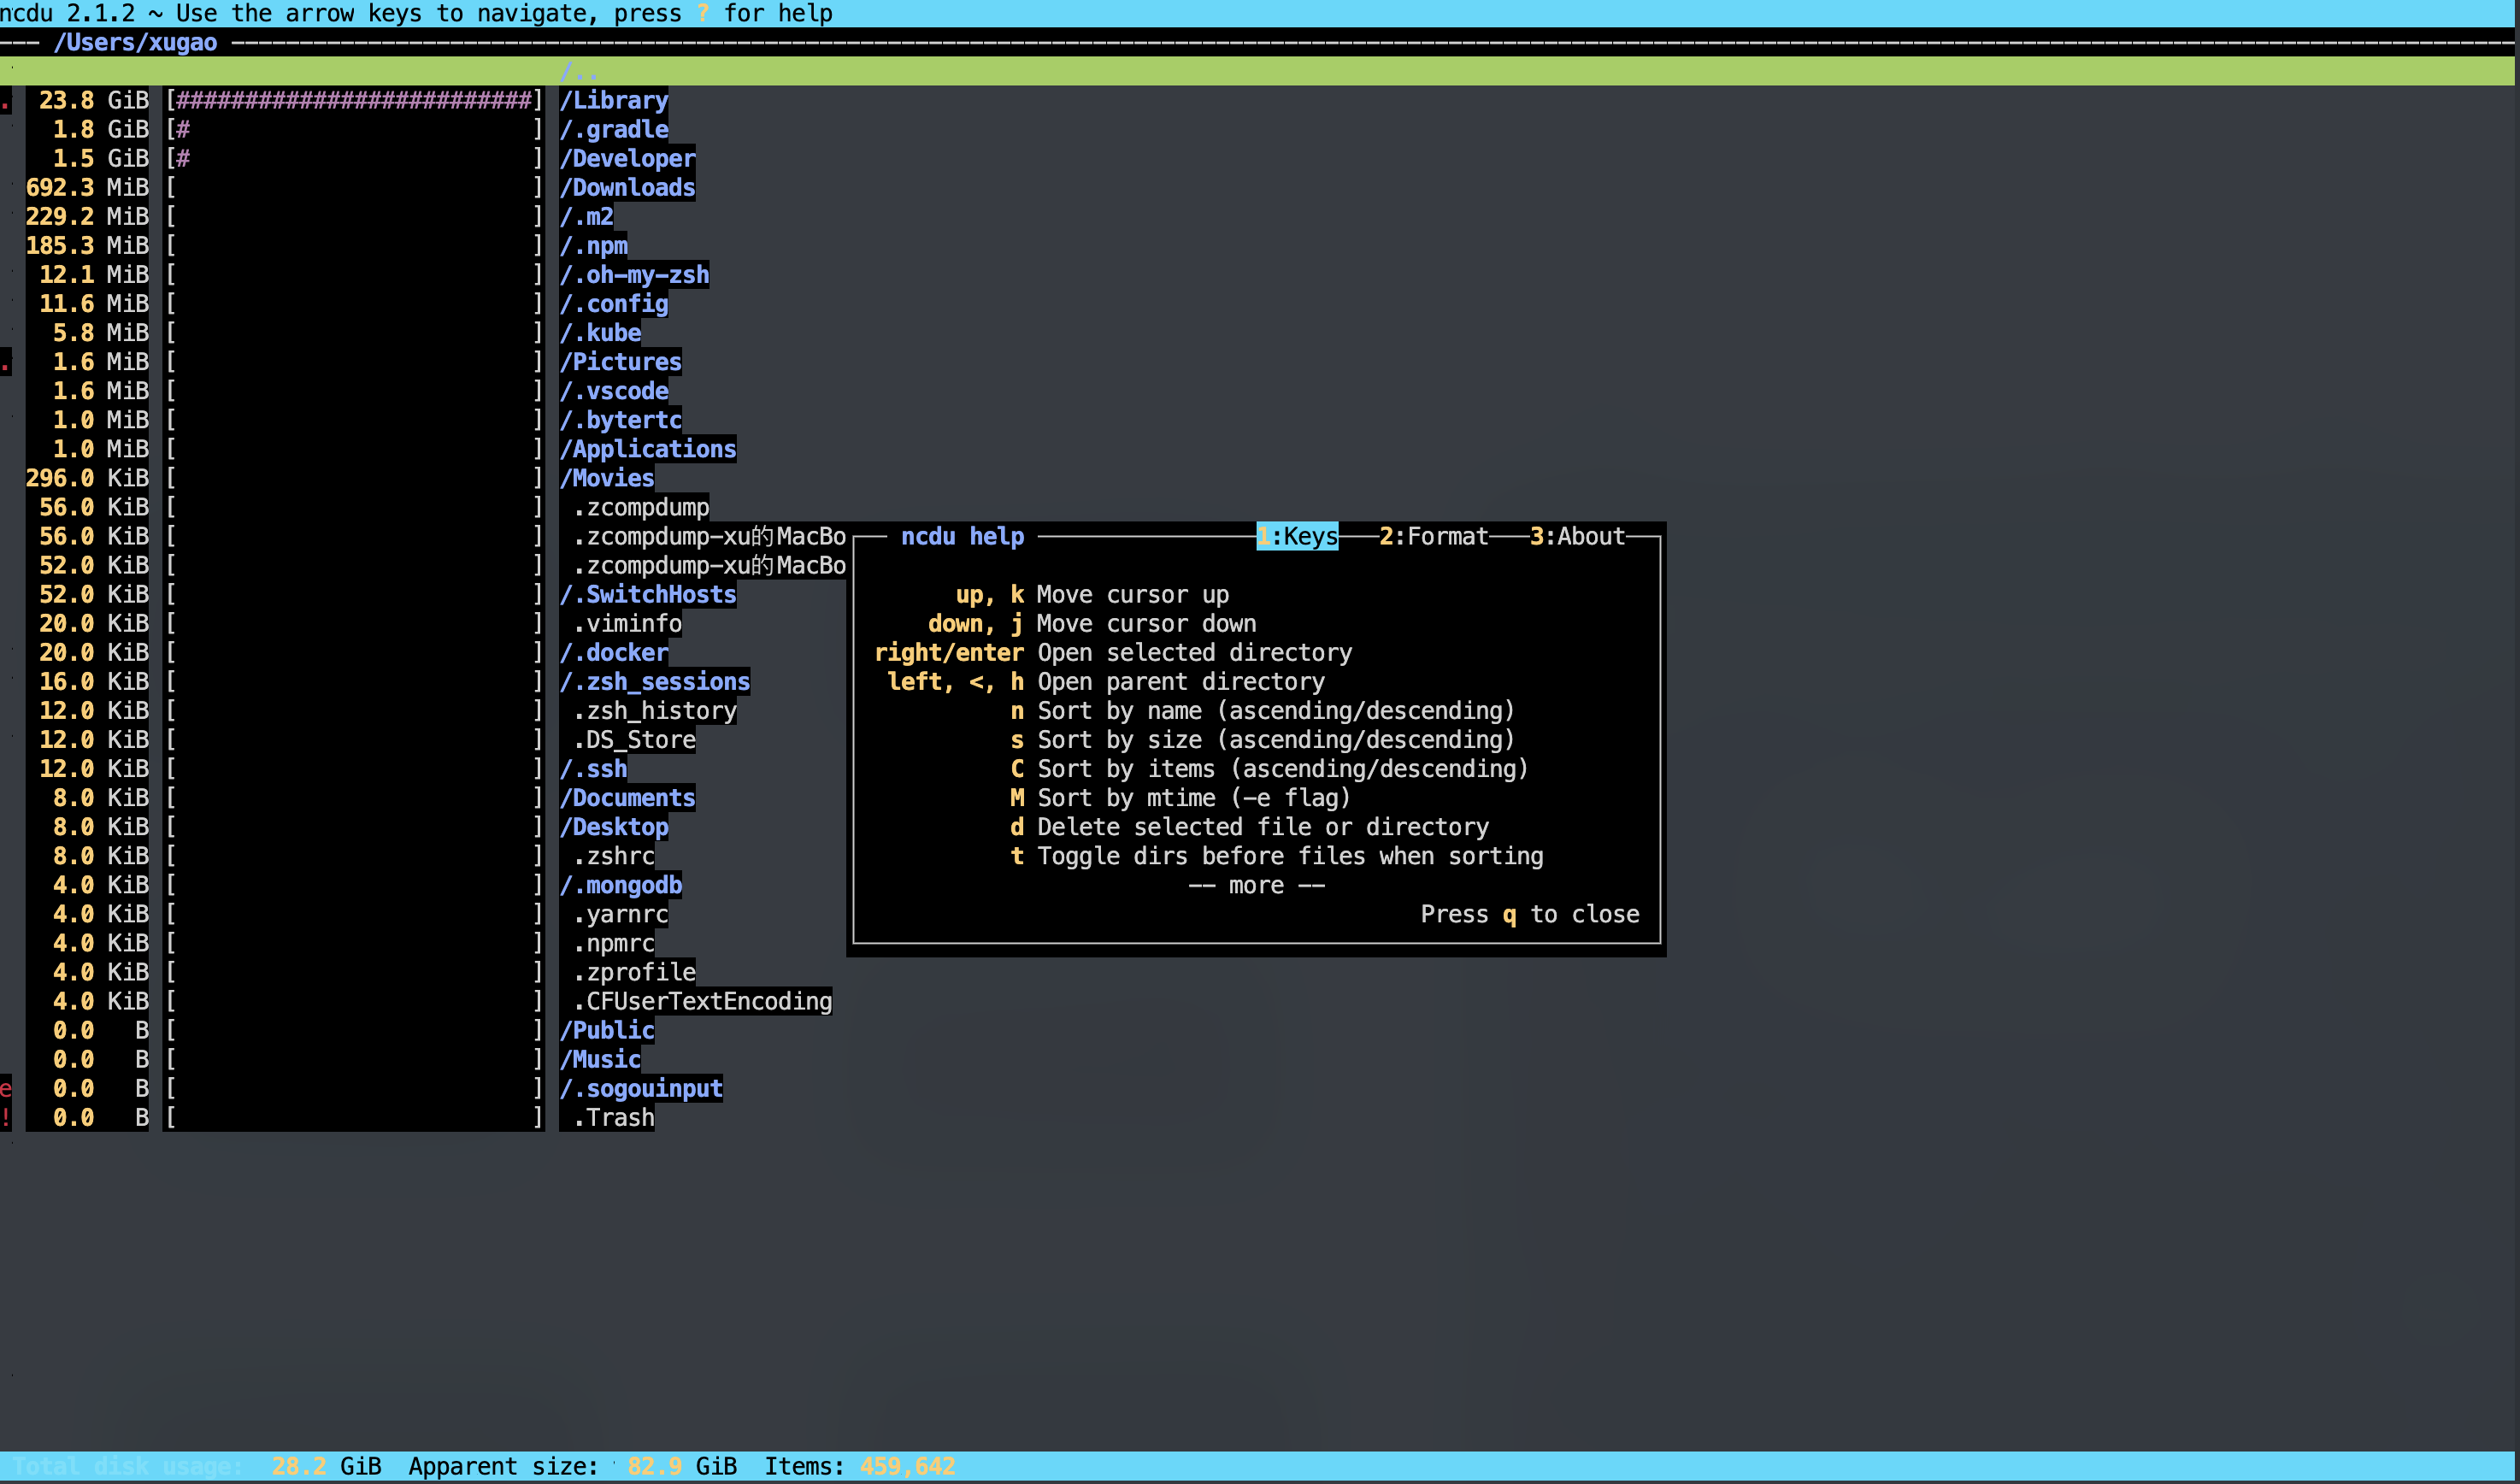
Ncdu 是一个带有 ncurses 接口的磁盘使用分析器。 它旨在在您没有可用的完整图形设置的远程服务器上查找空间占用者,但即使在常规桌面系统上它也是一个有用的工具。 Ncdu 的目标是快速、简单和易于使用,并且应该能够在安装了 ncurses 的任何最小的类似 POSIX 的环境中运行。

替代du -h等工具

安装

brew install ncdu

使用

查看当前目录磁盘使用,直接:

ncdu

查看指定目录

ncdu /  #根目录,全盘
ncdu /home

快捷键

up, k 上移光标
down, j 向下移动光标
right/enter 打开选中目录
left, <, h 打开父目录
n 按名称排序(升序/降序)
s 按大小排序(升序/降序)
C 按项目排序(升序/降序)
M 按 mtime 排序(-e 标志)
d 删除选中的文件或目录
t 排序时切换文件前的目录
g 显示百分比和/或图表
u 显示/隐藏硬链接共享大小
a 外观大小和磁盘使用率之间的切换
c 切换显示子项计数
e 显示/隐藏隐藏或排除的文件
i 显示所选项目的信息
r 重新计算当前目录
b 在当前目录中生成 shell
q 退出ncdu

· 阅读需 2 分钟
xu gao

问题

命令行连接明明没有问题,Spring Boot 的YML配置也是对的 但是死活出现密码不对。

报错日志

2021-11-23 15:04:02.492  WARN 12681 --- [oundedElastic-1] o.s.b.a.r.RedisReactiveHealthIndicator   : Redis health check failed

org.springframework.data.redis.RedisConnectionFailureException: Unable to connect to Redis; nested exception is org.springframework.data.redis.connection.PoolException: Could not get a resource from the pool; nested exception is io.lettuce.core.RedisConnectionException: Unable to connect to 172.18.150.9:6379
at org.springframework.data.redis.connection.lettuce.LettuceConnectionFactory$ExceptionTranslatingConnectionProvider.translateException(LettuceConnectionFactory.java:1689)
at org.springframework.data.redis.connection.lettuce.LettuceConnectionFactory$ExceptionTranslatingConnectionProvider.getConnection(LettuceConnectionFactory.java:1597)
at org.springframework.data.redis.connection.lettuce.LettuceConnectionFactory$SharedConnection.getNativeConnection(LettuceConnectionFactory.java:1383)
at org.springframework.data.redis.connection.lettuce.LettuceConnectionFactory$SharedConnection.getConnection(LettuceConnectionFactory.java:1366)
at org.springframework.data.redis.connection.lettuce.LettuceConnectionFactory.getSharedReactiveConnection(LettuceConnectionFactory.java:1117)
at org.springframework.data.redis.connection.lettuce.LettuceConnectionFactory.getReactiveConnection(LettuceConnectionFactory.java:509)
at org.springframework.data.redis.connection.lettuce.LettuceConnectionFactory.getReactiveConnection(LettuceConnectionFactory.java:103)
at reactor.core.publisher.MonoSupplier.call(MonoSupplier.java:86)
at reactor.core.publisher.FluxSubscribeOnCallable$CallableSubscribeOnSubscription.run(FluxSubscribeOnCallable.java:227)
at reactor.core.scheduler.SchedulerTask.call(SchedulerTask.java:68)
at reactor.core.scheduler.SchedulerTask.call(SchedulerTask.java:28)
at java.base/java.util.concurrent.FutureTask.run$$$capture(FutureTask.java:264)
at java.base/java.util.concurrent.FutureTask.run(FutureTask.java)
at java.base/java.util.concurrent.ScheduledThreadPoolExecutor$ScheduledFutureTask.run(ScheduledThreadPoolExecutor.java:304)
at java.base/java.util.concurrent.ThreadPoolExecutor.runWorker(ThreadPoolExecutor.java:1128)
at java.base/java.util.concurrent.ThreadPoolExecutor$Worker.run(ThreadPoolExecutor.java:628)
at java.base/java.lang.Thread.run(Thread.java:829)
Caused by: org.springframework.data.redis.connection.PoolException: Could not get a resource from the pool; nested exception is io.lettuce.core.RedisConnectionException: Unable to connect to 172.18.150.9:6379
at org.springframework.data.redis.connection.lettuce.LettucePoolingConnectionProvider.getConnection(LettucePoolingConnectionProvider.java:109)
at org.springframework.data.redis.connection.lettuce.LettuceConnectionFactory$ExceptionTranslatingConnectionProvider.getConnection(LettuceConnectionFactory.java:1595)
... 15 common frames omitted
Caused by: io.lettuce.core.RedisConnectionException: Unable to connect to 172.18.150.9:6379
at io.lettuce.core.RedisConnectionException.create(RedisConnectionException.java:78)
at io.lettuce.core.RedisConnectionException.create(RedisConnectionException.java:56)
at io.lettuce.core.AbstractRedisClient.getConnection(AbstractRedisClient.java:330)
at io.lettuce.core.RedisClient.connect(RedisClient.java:216)
at org.springframework.data.redis.connection.lettuce.StandaloneConnectionProvider.lambda$getConnection$1(StandaloneConnectionProvider.java:115)
at java.base/java.util.Optional.orElseGet(Optional.java:369)
at org.springframework.data.redis.connection.lettuce.StandaloneConnectionProvider.getConnection(StandaloneConnectionProvider.java:115)
at org.springframework.data.redis.connection.lettuce.LettucePoolingConnectionProvider.lambda$null$0(LettucePoolingConnectionProvider.java:97)
at io.lettuce.core.support.ConnectionPoolSupport$RedisPooledObjectFactory.create(ConnectionPoolSupport.java:211)
at io.lettuce.core.support.ConnectionPoolSupport$RedisPooledObjectFactory.create(ConnectionPoolSupport.java:201)
at org.apache.commons.pool2.BasePooledObjectFactory.makeObject(BasePooledObjectFactory.java:70)
at org.apache.commons.pool2.impl.GenericObjectPool.create(GenericObjectPool.java:571)
at org.apache.commons.pool2.impl.GenericObjectPool.borrowObject(GenericObjectPool.java:298)
at org.apache.commons.pool2.impl.GenericObjectPool.borrowObject(GenericObjectPool.java:223)
at io.lettuce.core.support.ConnectionPoolSupport$1.borrowObject(ConnectionPoolSupport.java:122)
at io.lettuce.core.support.ConnectionPoolSupport$1.borrowObject(ConnectionPoolSupport.java:117)
at org.springframework.data.redis.connection.lettuce.LettucePoolingConnectionProvider.getConnection(LettucePoolingConnectionProvider.java:103)
... 16 common frames omitted
Caused by: io.lettuce.core.RedisCommandExecutionException: NOAUTH Authentication required.
at io.lettuce.core.internal.ExceptionFactory.createExecutionException(ExceptionFactory.java:137)
at io.lettuce.core.internal.ExceptionFactory.createExecutionException(ExceptionFactory.java:110)
at io.lettuce.core.protocol.AsyncCommand.completeResult(AsyncCommand.java:120)
at io.lettuce.core.protocol.AsyncCommand.complete(AsyncCommand.java:111)
at io.lettuce.core.protocol.CommandWrapper.complete(CommandWrapper.java:63)
at io.lettuce.core.protocol.CommandHandler.complete(CommandHandler.java:746)
at io.lettuce.core.protocol.CommandHandler.decode(CommandHandler.java:681)
at io.lettuce.core.protocol.CommandHandler.channelRead(CommandHandler.java:598)
at io.netty.channel.AbstractChannelHandlerContext.invokeChannelRead(AbstractChannelHandlerContext.java:379)
at io.netty.channel.AbstractChannelHandlerContext.invokeChannelRead(AbstractChannelHandlerContext.java:365)
at io.netty.channel.AbstractChannelHandlerContext.fireChannelRead(AbstractChannelHandlerContext.java:357)
at io.netty.channel.DefaultChannelPipeline$HeadContext.channelRead(DefaultChannelPipeline.java:1410)
at io.netty.channel.AbstractChannelHandlerContext.invokeChannelRead(AbstractChannelHandlerContext.java:379)
at io.netty.channel.AbstractChannelHandlerContext.invokeChannelRead(AbstractChannelHandlerContext.java:365)
at io.netty.channel.DefaultChannelPipeline.fireChannelRead(DefaultChannelPipeline.java:919)
at io.netty.channel.nio.AbstractNioByteChannel$NioByteUnsafe.read(AbstractNioByteChannel.java:166)
at io.netty.channel.nio.NioEventLoop.processSelectedKey(NioEventLoop.java:719)
at io.netty.channel.nio.NioEventLoop.processSelectedKeysOptimized(NioEventLoop.java:655)
at io.netty.channel.nio.NioEventLoop.processSelectedKeys(NioEventLoop.java:581)
at io.netty.channel.nio.NioEventLoop.run(NioEventLoop.java:493)
at io.netty.util.concurrent.SingleThreadEventExecutor$4.run(SingleThreadEventExecutor.java:986)
at io.netty.util.internal.ThreadExecutorMap$2.run(ThreadExecutorMap.java:74)
at io.netty.util.concurrent.FastThreadLocalRunnable.run(FastThreadLocalRunnable.java:30)
... 1 common frames omitted

具体原因

问题出在客户端上,某些云厂商魔改的redis导致协议跟官方有出入。所以导致lettuce在判断协议时 并不准确。

想了解更多的请参考我提的issues1543

如何解决

方式一

降级lettuce客户端到5.3.x,因为自动识别RESP2/RESP3协议是6.x版本加上去的

build.gradle
implementation 'io.lettuce:lettuce-core:5.3.7.RELEASE'

方式二

@Configuration
public class WebConfig implements WebMvcConfigurer {

/**
* fix
* https://github.com/lettuce-io/lettuce-core/issues/1201
* https://github.com/lettuce-io/lettuce-core/issues/1543
*/
@Bean
public LettuceClientConfigurationBuilderCustomizer redisBuilderCustomizer() {
return builder -> builder.clientOptions(
ClientOptions
.builder()
.protocolVersion(ProtocolVersion.RESP2)
.build()
);
}
}

· 阅读需 1 分钟
xu gao

img.png

背景

提示:

“graalvm-ce-java11-20.3.0” is damaged and can’t be opened.

“graalvm-ce-java11-21.3.0”已损坏,无法打开。

如何解决

在 macOS Catalina 上,您可能会收到“无法验证开发人员”的警告。这是因为 GraalVM 尚未签名和认证。但是,可以在“安全和隐私”首选项窗格中或通过运行以下命令来禁用该检查:

xattr -r -d com.apple.quarantine /Library/Java/JavaVirtualMachines/graalvm-ce-javaV-XX.Y.Z

官方解释和说明

· 阅读需 6 分钟
xu gao

img.png

提示

2022.2 以上建议直接用推荐方式激活(#通过agent+激活码方式1)

通过agent+激活码方式1

  1. JetBrains官网 下载安装你需要的 IDE,如果下载慢可以在 macwk 搜索 jetbrains。
  2. 下载 Jetbrains.zip,下载后解压,得到 fineagent.jar,将该文件复制到 /Users/你的用户名/ 文件夹下
  3. 打开访达,点击左侧的 应用程序 找到 WebStorm,在 WebStorm 图标上右键,点击 显示包内容
  4. 进入 Contents 目录,再进入 bin 目录,使用文本编辑器打开 webstorm.vmoptions 文件
  5. 在最后面添加 -javaagent:/Users/你的用户名/fineagent.jar,记得修改一下你的用户名。
  6. 运行 WebStorm, 选择 Activate WebStorm,再点击 Activation Code
  7. 复制下面的的激活码粘贴到激活窗口的输入框中,点击 Activate。可以用到 2099 年!
5AYV1D1RE5-eyJsaWNlbnNlSWQiOiI1QVlWMUQxUkU1IiwibGljZW5zZWVOYW1lIjoiaHR0cHM6Ly93d3cuaml3ZWljaGVuZ3podS5jb20iLCJhc3NpZ25lZU5hbWUiOiIiLCJhc3NpZ25lZUVtYWlsIjoiIiwibGljZW5zZVJlc3RyaWN0aW9uIjoiIiwiY2hlY2tDb25jdXJyZW50VXNlIjpmYWxzZSwicHJvZHVjdHMiOlt7ImNvZGUiOiJJSSIsImZhbGxiYWNrRGF0ZSI6IjIwOTktMTItMzEiLCJwYWlkVXBUbyI6IjIwOTktMTItMzEifSx7ImNvZGUiOiJBQyIsImZhbGxiYWNrRGF0ZSI6IjIwOTktMTItMzEiLCJwYWlkVXBUbyI6IjIwOTktMTItMzEifSx7ImNvZGUiOiJEUE4iLCJmYWxsYmFja0RhdGUiOiIyMDk5LTEyLTMxIiwicGFpZFVwVG8iOiIyMDk5LTEyLTMxIn0seyJjb2RlIjoiUFMiLCJmYWxsYmFja0RhdGUiOiIyMDk5LTEyLTMxIiwicGFpZFVwVG8iOiIyMDk5LTEyLTMxIn0seyJjb2RlIjoiR08iLCJmYWxsYmFja0RhdGUiOiIyMDk5LTEyLTMxIiwicGFpZFVwVG8iOiIyMDk5LTEyLTMxIn0seyJjb2RlIjoiRE0iLCJmYWxsYmFja0RhdGUiOiIyMDk5LTEyLTMxIiwicGFpZFVwVG8iOiIyMDk5LTEyLTMxIn0seyJjb2RlIjoiQ0wiLCJmYWxsYmFja0RhdGUiOiIyMDk5LTEyLTMxIiwicGFpZFVwVG8iOiIyMDk5LTEyLTMxIn0seyJjb2RlIjoiUlMwIiwiZmFsbGJhY2tEYXRlIjoiMjA5OS0xMi0zMSIsInBhaWRVcFRvIjoiMjA5OS0xMi0zMSJ9LHsiY29kZSI6IlJDIiwiZmFsbGJhY2tEYXRlIjoiMjA5OS0xMi0zMSIsInBhaWRVcFRvIjoiMjA5OS0xMi0zMSJ9LHsiY29kZSI6IlJEIiwiZmFsbGJhY2tEYXRlIjoiMjA5OS0xMi0zMSIsInBhaWRVcFRvIjoiMjA5OS0xMi0zMSJ9LHsiY29kZSI6IlBDIiwiZmFsbGJhY2tEYXRlIjoiMjA5OS0xMi0zMSIsInBhaWRVcFRvIjoiMjA5OS0xMi0zMSJ9LHsiY29kZSI6IlJNIiwiZmFsbGJhY2tEYXRlIjoiMjA5OS0xMi0zMSIsInBhaWRVcFRvIjoiMjA5OS0xMi0zMSJ9LHsiY29kZSI6IldTIiwiZmFsbGJhY2tEYXRlIjoiMjA5OS0xMi0zMSIsInBhaWRVcFRvIjoiMjA5OS0xMi0zMSJ9LHsiY29kZSI6IkRCIiwiZmFsbGJhY2tEYXRlIjoiMjA5OS0xMi0zMSIsInBhaWRVcFRvIjoiMjA5OS0xMi0zMSJ9LHsiY29kZSI6IkRDIiwiZmFsbGJhY2tEYXRlIjoiMjA5OS0xMi0zMSIsInBhaWRVcFRvIjoiMjA5OS0xMi0zMSJ9LHsiY29kZSI6IlJTVSIsImZhbGxiYWNrRGF0ZSI6IjIwOTktMTItMzEiLCJwYWlkVXBUbyI6IjIwOTktMTItMzEifV0sImhhc2giOiIxMjc5Njg3Ny8wIiwiZ3JhY2VQZXJpb2REYXlzIjo3LCJhdXRvUHJvbG9uZ2F0ZWQiOmZhbHNlLCJpc0F1dG9Qcm9sb25nYXRlZCI6ZmFsc2V9-HNPogO0kWkHCVMnsjmBXUqQt87UPHqdkYqZGveSJtu8hb2V2Yq7gHsHenp4UuEd3jwEwC+YrUIf7U5yDA/56F5Sdn0RLUHZX5DHeQbJPbmYCBsDRT7m8rnmMFOSZn3vwNatvv1cooZbcGOk3Wwxx6bF7XcgaIrmXRcmZMZgv2PZehr0WS1HxNKe3X4nbGP3MwiSbg4ypmxNDrljmgv+Si9QDDwNLDffqeO0Lce0FqEJuMWmvBS42S0aeIYF8IS5bp4+LFKLJ8T7tF40OxKYDurBb9+9c43GZBscM/eLB8Jos66jNGFwgebFUlvhzJKVHZtuc/N8zGeEnTq6K0T/B8w==-MIIDTjCCAjagAwIBAgIBDTANBgkqhkiG9w0BAQsFADAYMRYwFAYDVQQDDA1KZXRQcm9maWxlIENBMCAXDTE4MTEwMTEyMjk0NloYDzIwOTkwODA5MDIyNjA3WjAfMR0wGwYDVQQDDBRwcm9kMnktZnJvbS0yMDIwMTAxOTCCASIwDQYJKoZIhvcNAQEBBQADggEPADCCAQoCggEBAMK3eyr0+Oys/TwcQO+qYaXWGBmXcEP4fR0bHHzZd/4WNGltXhecM80OWthA38BQRYAJBCKz/dSkO2Kj1H2y+7KB5cIaOiJEyTESfTSgzQdot6laRBU8oxy9mmagI46M8zEEmplPybY4YJj4HOwZiBsMQEMxoTgMDLpuHX6uASoVhSj6koB55lOj4wEgsQBeAMWTAXmTl88ixE179J8aBUkBGpL8w/tZzl9BJXZNF15gPfkS58rw8cdPzXLS0Yym37A2/KKFhfHzJc5KhbaxqYzmkAfTMqPsIqCQ1lQUAqfiPn2gN2I1Z3/cQuEW27M55fXVr2DduQe5DWzYJs85L50CAwEAAaOBmTCBljAJBgNVHRMEAjAAMB0GA1UdDgQWBBQk2hEilvWFQcCTR+gxI0z0wIQC/zBIBgNVHSMEQTA/gBSjnrZIZ0ISNkG9beC5tKBSi5fxs6EcpBowGDEWMBQGA1UEAwwNSmV0UHJvZmlsZSBDQYIJANJssYOyg3nhMBMGA1UdJQQMMAoGCCsGAQUFBwMBMAsGA1UdDwQEAwIFoDANBgkqhkiG9w0BAQsFAAOCAQEAsCQBjO5wttco/Z5cj/o4GBrku8UtBBBVFq4xsBanshTHm4deVxcTvta4aScV0TPKcaLqGqWx8A9v8XXO8dBbCuyXvWZteZ/C2Covg1xXiM99lz7VxqpjVmLdKanZn5u0gQSiYJdcfF+TdbmEIeSOnN/kLXNq2hXdJQK2zk2J25UZqu5EibRtTbdOzw6ZcfwJ8uOntXfsmAhnNICP3Wf/4wR/mwB0Ka4S+JA3IbF5MUmUZ/fjUaFarnin70us+Vxf/sZUi7u67wilvwVV0NAqDpthHUV0NRc4q+yOr2Dt/uCHdy4XRXLJfAv/z9/xBwNZZALNz3EtQL6IeIWWJByl3g==

通过agent+激活码方式2(推荐)

点我传送 Or 点我传送

不会用或者 2022.2 激活不了的仔细看常见问题里的 "激活操作" 常见问题


通过激活服务器在线激活

网站1

  1. 首先打开https://search.censys.io/这个网站
  2. 搜索框输入 services.http.response.headers.location: account.jetbrains.com/fls-auth
  3. 在搜索的返回结果中随便找一台服务器 找里面返回(Status Code 302)302的那条
  4. 打开 IDEA 激活选择 License server 填写上面找的服务器ip+端口激活即可

网站2

  1. 首先打开https://www.shodan.io/这个网站
  2. 搜索框输入 Location: https://account.jetbrains.com/fls-auth

后面的步骤就和上面一样了

原理就是利用搜索引擎寻找 jetbrains 授权服务器,如果寻找到的服务器用不了多换几个就好了 不稳定也同理


无限重置试用(新版已废弃)

此方法 Windows MacOS 通用

背景

Jetbrains 家的产品有一个很良心的地方,他会允许你试用 30 天(这个数字写死在代码里了)以评估是否你真的需要为它而付费。 但很多时候会出现一种情况:IDE 并不能按照我们实际的试用时间来计算。

我举个例子:如果我们开始了试用,然后媳妇生孩子要你回去陪产!陪产时我们并无空闲对IDE试用评估,它依旧算试用时间。(只是举个例子,或许你并没有女朋友)

发现了吗?你未能真的有 30 天来对它进行全面的试用评估,你甚至无法作出是否付费的决定。此时你会想要延长试用时间,然而 Jetbrains 并未提供相关功能,该怎么办?

事实上有一款插件可以实现这个功能,你或许可以用它来重置一下试用时间。但切记不要无休止的一直试用,这并不是这个插件的初衷!

· 阅读需 13 分钟
xu gao

本文建议读者:

  • 后端工程师、架构师
  • 需要跟后端协同的前端工程师
  • 以API提供服务的软件提供商

前言


作为一名优秀的后端程序员,你照着产品需求设计好了模型,设计好了关联关系。

把这些模型和关系一再打磨了一番之后,你想是时候把API设计出来,与前端沟通了。

这时候问题来了:

一旦 API 进入前端 APP 代码,或者是被你的顾客广泛使用的话,再来大改就非常麻烦了。比如说,如果 APP 版本 1.0 用了一个接口 A,这个接口 A 如果要进行大改,那么必须将 A 维持至所有用户升级过 APP 1.0 后。

那么怎么样避免 API 发布之后大改呢?有没有一些提前可以注意到的设计准则可以帮我们避开 API 设计中的各种坑?

答案是有的。网上充满了各种对 API 设计的建议,而这篇文章里我们结合卡拉搜索设计 API 的经验,把 REST API 的最佳实践和常见的坑都总结出来,做成一个教程,希望可以在帮到正在设计/使用 API 的你。

· 阅读需 2 分钟
xu gao

前言

NFS 是 Network File System 的缩写,即网络文件系统。功能是让客户端通过网络访问不同主机上磁盘里的数据,主要用在类Unix系统上实现文件共享的一种方法。 本例演示 CentOS 7 下安装和配置 NFS 的基本步骤。